It’s been getting chilly and crisp in Indiana, PA this past week and I don’t know about you but fall weather makes me want to sit inside and make something. If you are like me, you might be interested in experimental archaeology which is a practice where archaeologists make and utilize technologies of past people in order to understand them better. Archaeologists use experimental archaeology to test hypotheses of how and why people used different technologies. Typically, materials are gathered from the environment around you making it an accessible hobby for anyone interested in the technologies of the past. Here are some experimental archaeology crafts that you can do while you enjoy the lovely fall weather!
The first and most beloved example is flintknapping! This is a process that pre-contact societies used to make stone tools. It involves carefully chipping away at specific parts of a “raw” stone, also called a core. You first start with percussion flakes which chip off because of the force you apply to certain parts of the core. Then, you take off smaller pieces by applying pressure to an edge of the core with a deer antler or some other type of sharpened tool. This step refines the tool into whatever you want it to be such as an arrow/spear point or an adze. If you have kids or if you’re worried about injuring yourself you can also try “soapknapping” which takes some of the same ideas of flintknapping as you carve your stone tool out of a bar of soap. The supplies needed for flintknapping are flint/chert which is what you make your stone tool out of, a hammerstone, a piece of leather to protect your leg, a billet made from deer antler or hard wood, and an antler tine or sharpened wood for pressure flaking.
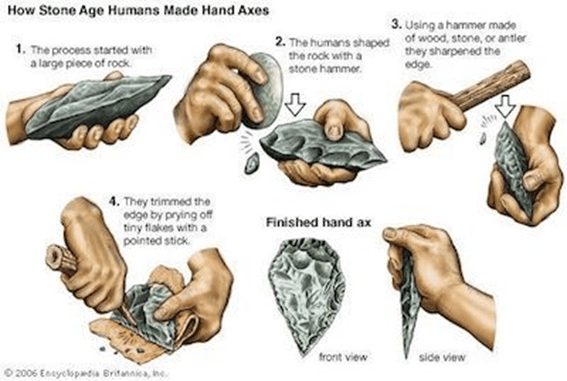
The process of flintknapping. Credit: Closter Nature Center
If stone tools aren’t your thing maybe you would like to make a basket out of pine needles, sweetgrass, or other dry plant materials that you can forage. There are many ways to make a basket but one of the most comprehensible ways is by coiling. To make a coiled basket you first have to collect the materials. Once you have your pine needles or sweetgrass make sure to wash them, bundle them, and lay them out to dry before you start working with them. Once they are dry, you can finally begin by wrapping a cord that is attached to a tapestry needle around a bundle of around four to six pieces of your material. Your foundation cord should be wrapped 10-15 times and be ¾ inch long at first. Then, you will curl the end in and start the spiral formation by pushing the needle through the middle of the two beginning rows and sewing the new rows into the previous coil. If this sounds incredibly confusing don’t worry, there are step-by-step instructions linked at the bottom under “Sources and Further Reading”.
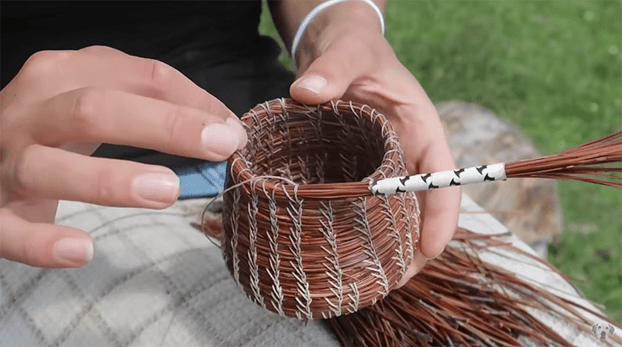
Making a coiled pine needle basket.
If you’re looking for an easier project, you could make a pinch pot which is one way Native Americans made pottery for food storage and cooking. To make a pot you need to either find clay in a local clay bed, buy it at your local craft store, or make it by looking up a salt-dough recipe. If you collect your clay, you will likely have to process it so if you are looking for a really easy project you might want to stick with air-dry clay. Once your clay is prepared, roll it out and then roll it into a ball. Then you will put your thumb in the center to make a crater in the clay and from that crater you can pinch the sides of your pot to your desired thickness. From there you can add imprinted designs using a pencil or anything else you have around your house! If you are using air-dry clay then you can simply set your project out to dry but if you are using a salt-dough or you gathered clay you will have to bake and fire it respectively.
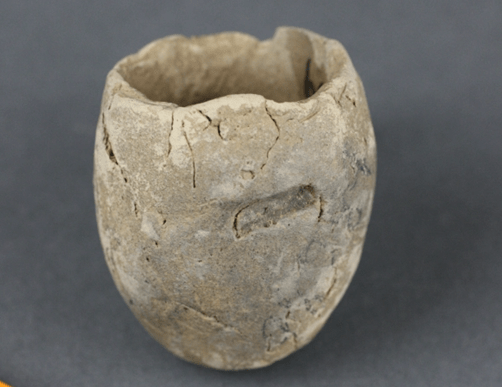
A pinch pot made by a young girl from Abbott Farm excavations. The center scar is from a twig impression in the clay. NJSM # AE98089.
No matter what project you choose, you will be able to get into the mindset of the people who created and used these technologies many years ago. This is what archaeologists are interested in, understanding the people of the past through the materials that they produced. By making these materials ourselves, we can get a sense of what it was like to make them and experiment with different processes to test the feasibility of certain hypotheses. We can also have fun while we’re at it which is a big benefit!
Sources and Further Reading:
https://exarc.net/experimental-archaeology
Flintknapping:
https://archaeology.uiowa.edu/flintknapping-0 https://www.elymuseum.org.uk/wp-content/uploads/2021/01/HAH-worksheet-Pre-history-Stone-Age-Knapping.pdf
https://wildernessawareness.org/articles/stone-tools-and-flintknapping/
Basket Weaving:
http://www.nativetech.org/basketry/coilinstr.html
https://www.knowitall.org/interactives/anaturalstate/pine-needle-basket/
https://www.floridamuseum.ufl.edu/sflarch/collections/seminole-baskets/technique/
Pinch Pot:
https://www.instructables.com/Harvesting-Your-Own-Clay-Dirty-But-Delightful/
https://exploreandmore.org/sanity-savers-salt-dough-unicorns-and-easter-eggs/
https://thepotterywheel.com/pinch-pot-history/
https://newjerseyarchaeology.wordpress.com/2016/02/04/miniature-clay-pot-an-ancient-toy/
Image Credits:
https://closternaturecenter.org/?event=primitive-technology-2
https://thekidshouldseethis.com/post/how-to-weave-pine-needle-baskets
https://newjerseyarchaeology.wordpress.com/2016/02/04/miniature-clay-pot-an-ancient-toy/