January 10

Running a Buffer and Chain Engine With Knuckle Couplings

When it comes to model railroading, couplings do not always match up. Many live steam engines use some variation of the Buffer and Chain system, so making those work together is never a major hassle. In the United States, however, the most common system is the Knuckle coupling. So how do you make these work together?

Mixing different couplings can be done in a few ways, including using a sort of “translator” car. There isn’t a specific term for these cars that I know of, but they exist. This is essentially a car that has different types of couplers on either end.

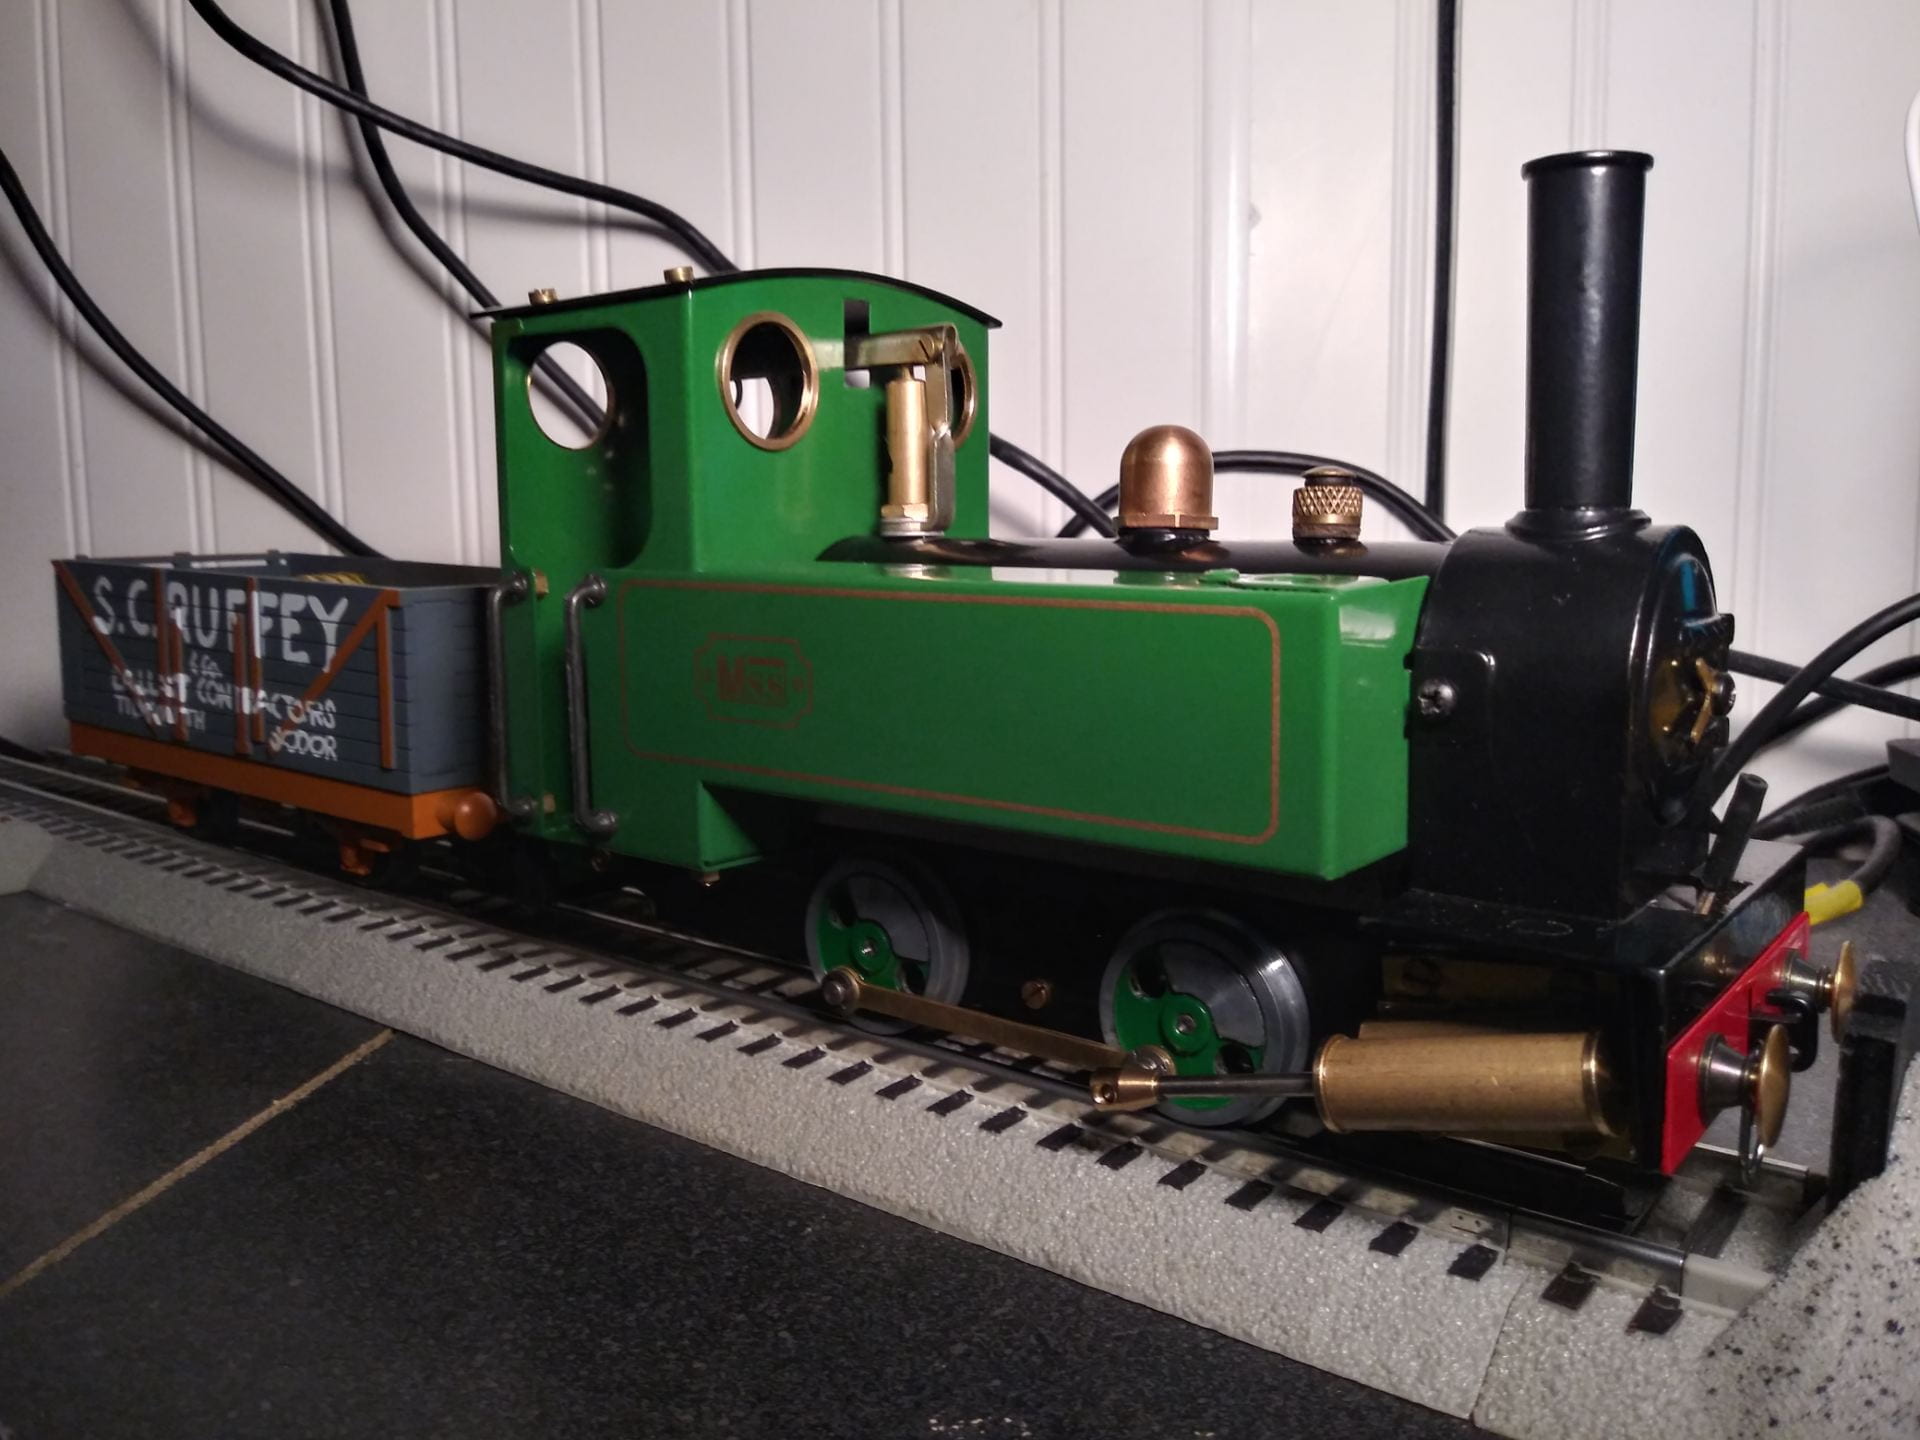
To start, I grabbed a gondola that wouldn’t look too out of place next to the engine.

This gondola only has 2 axles, so it bears the closest resemblance to something this locomotive might have pulled. American rolling stock will always look out of place with this engine, but this model is at least acceptable.

I started with flipping the gondola over to check for clearance.

The space in front of the axle mount is the perfect place for a chain mount. For this I used an extra bracket that came with a cheap stereo.

This seemed to fit well into that spot, until I realized the knuckle coupling couldn’t clear the new part. I did not want to limit this gondola to only being used with one engine, so I had to find a way to make both couplers clear each other.

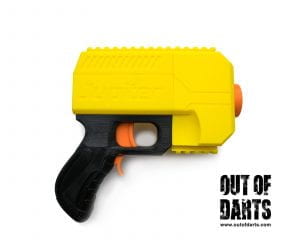
After checking the parts bin, I came across a small spring. If I had to guess, it probably came from a rail attachment point for a Nerf gun.

Older models of blasters had sprung clips to help hold accessories. Blasters with this part can be identified by pushing on the orange piece on the top of the blaster. You’ll know whether it’s sprung right away. These springs are short, fat, and pretty useless at holding on attachments. If you need a small spring for something, this is a place you can get one in a pinch.

So, I used the short spring to add a bit of height to the knuckle coupler. The spring helps hold parts under tension, which should keep the knuckle coupler from coming loose. After that, I made some chain from wire. This is the result.

Separate from the chain link permanently on the mount, there is also another a partially open link that can be taken off as needed. This allows for the use of the knuckle coupler as needed.

This system works pretty well on the tracks. The gondola now allows the MSS engine to couple to engines or rolling stock with a knuckle coupler.

But the gondola still works just fine when used with other rolling stock.


I am pretty happy with how the gondola has turned out so far. The only problem I have is the gondola is very light, so it tends to derail and jump switches. This can be fixed just by loading the gondola with something, which I am planning on anyway. I haven’t fitted the gondola with buffers at the moment. They are not entirely necessary for pulling and this is only a short term solution anyway. Eventually I will get/build rolling stock for the MSS, which will make the gondola obsolete.

Then again, having the option to pull and push American rolling stock with the steam engine could be very nice. So maybe someday I will get around to adding buffers to the gondola. But that is a blog for another time.

Remember to leave a like if you enjoyed this post and leave a comment below. Subscribe for more content like this and remember to share this post with people who might enjoy it.

January 10

Bullpup Conversions in Hobby-Grade Arms

When applied to firearms, bullpup configurations offer the power and accuracy of normal arms, but with a smaller form. This is because the action is set behind the trigger, allowing for a longer barrel or smaller form. But how do bullpups apply to hobby-grade items like airsoft guns or dart blasters?

Starting with the easy one, airsoft. Bullpups have almost no benefits with this type of gun. The in the case of AEGs, the barrel length has minimal effect on power or accuracy. Gas powered airsoft guns also see minimal benefit from a bullpup configuration. There are plenty off bullpup options and conversions in airsoft, but they have minimal benefit outside of style.

Dart blasters seemingly have nothing to gain from a bullpup setup. Added barrel length generally hurts velocity, and barrels provide no benefit to accuracy. So converting a blaster to a configuration with a long barrel even at minimum is a terrible idea. At least it would seem that way.

Bullpup dart blasters actually accept two-stage flywheel cage conversions particularly well. The added barrel length makes it easy to fit in multiple flywheel cages into one blaster. A bullpup configuration would allow the user to pack a lot of power into a relatively small package.

The big disadvantage with a bullpup dart blaster is the sheer rarity of them. There is only one bullpup conversion kit available for the Stryfe. Other than that, bullpup blasters have to be hand built. This can get very time consuming, as well as very heavy on the materials consumed. Most bullpup builds I have seen use up no less than three separate blasters just to make one. Bullpup conversions just aren’t practical for this reason.

When applied to hobby-grade arms, bullpups just don’t hold up. They offer few benefits outside of style, and in some cases are far less accessible. As far as bullpup conversions go, they’re better left to the real steel.

Remember to leave a like if you enjoyed this post and leave a comment below. Subscribe for more content like this and remember to share this post with people who might enjoy it.

Category: Nerf | LEAVE A COMMENT
January 10

A Look at “Mamodification”

When it comes to model railroading, I’ve always been a bit disappointed with the lack of customization with engines and rolling stock. This makes sense since most models are based on specific units with set liveries, but most models don’t even get basic weathering. A lot of model engines just stay standard and clean, which is a bit boring. This is a problem that is solved with live steam engines. Many live steam engines use freelance designs that aren’t modeled after anything in particular, which is great for customization. One model stands out above the rest for how malleable it’s design is; the Mamod SL1.

A stock MSS for reference.

The SL design has seen tons of variation over the last 40 years just in production models, not to mention what the modding community has been up to. Just through paintwork, trim, and accessories you can totally transform the look of the Mamod.

The bodywork can be pushed even further than that. Mamods have appeared as saddle tank engines and even trams.


MSR have even managed an American-styled Mamod.It only gets crazier from here on. This design even lends itself well to other wheel configurations. To start, take this 0-4-2 tender engine as an introduction.

There are also plenty of 0-6-0 Mamod designs out there as well. Take a look at this War Department styled 0-6-0 model.

From here we start to see the genuinely bonkers builds. It’s one thing to change up some bodywork or add a wheel, making the next model is a completely different level. This is a Mamod Garratt K1.

The level of commitment needed for someone to put together an articulating framed engine is bonkers. The Garratt Mamods are always beautiful and diverse. This is not even the only type of articulated Mamod that people have made. There are quite a few examples on the web of Double-Fairlie Mamods. Here is one such model.

The level of customization possible with a Mamod or MSS locomotive is unlike anything else I have seen. Live steam in general is more open to customizing locomotives, but the Mamod is particularly well suited to it. Down below are links to the forums related to “Mamodification.” You can also click each image above to go to their respective origins.

Click here for the Garratt.

Click here for the Double-Fairlie.

Click here for everything else.

Remember to leave a like if you enjoyed this post and leave a comment below. Subscribe for more content like this and remember to share this post with people who might enjoy it.

January 10

Bullpup Conversions in Firearms

When it comes to firearms, there are a lot of limitations to modification. Unlike hobby-grade arms, you cannot usually make major changes to the size of a firearm without heavy restrictions. Whether you’re adding a stock to a pistol for compact stability, or shortening a full-sized weapon for close quarters, there are restrictions to keep people from making these changes. There is an option for those that want a compact firearm, but want to avoid ATF restrictions. Introducing the Bullpup conversion.

Demo image of a bullpup conversion. Added polymer body shell is represented in the red outline. Trigger linkage represented in green

Bullpup conversions change nothing about the base weapon. They simply change how you interact with it. The grip is moved somewhere in front of the receiver, where a second trigger interacts with the original trigger through a linkage. Other parts sometimes need extensions to make up for the new configuration. With the trigger moved in front of the receiver, the area around the original trigger becomes the point where the stock is attached.

Usually, in the case of firearms, this is done with a polymer body shell. So the stock and body are one unit that fits over the original gun, covering up the trigger linkage and original trigger. The polymer construction gives bullpups a distinct look outside of the already unusual configuration.

There are complaints around the web regarding the build quality and polymer construction. Bullpup kits can be very hit or miss with quality. The most common complain with Bullpup conversions is the way the Trigger feels. The triggers in these kits are often described as “squishy” because of the trigger linkage.

There is a fair variety of kits available. Most notably are the shotgun kits from Bullpup Unlimited. They offer Bullpup kits for a variety of  shotguns. These seem to offer the most consistent quality if the kits I have looked at. On top of the Bullpup Unlimited kits there are plenty of other kits available for other models. This includes a p90 lookalike that can be built from a Ruger 10/22, and a kit for the SKS.

Bullpup conversion kits offer a way to make a full sized firearm more compact. The quality of these kits can vary greatly, but there are some solid options. These compact offerings can be useful. But bullpup conversions can also excel with hobby-grade arms. That is a blog for another time.

Remember to leave a like if you enjoyed this post and leave a comment below. Subscribe for more content like this and remember to share this post with people who might enjoy it.

January 10

Vlog – How To Get a Pokémon Emerald Randomizer Hack Working


https://www.youtube.com/watch?v=F1hzg_hWXFk

Here is a quick tutorial on how to get a randomizer hack running. Links to everything you need are available here:

Ramdomizer hack.

Java Runtime

Emulator

To find a base ROM, I would recommend looking on r/roms. There are plenty of helpful people there that will point you in the right direction.

For more quality content, check out my YouTube channel here.  If you enjoyed the video, remember to like, comment. and subscribe!

January 9

Nerf Trilogy Shorty Build

What do you do with a blaster that is too large to be a secondary, but is too bad to be a usable primary? You either make it work better to be a primary, or minimize it for use as a secondary. The Nerf Trilogy is the perfect example of this debate going nowhere. That is until I came along.

Quick rundown of the blaster: The Trilogy is a pump-action, top fed, single shot blaster. It uses shells to fire 3 darts at one time before ejecting the shell. The whole system is slow. Shells are terrible, and having the blaster throw your only means of firing roughly on the ground is a recipe for disaster. One way or another the shells that come with the blaster will stop being usable from being ejected.

That’s if the blaster comes with them in the first place. The Trilogy I own originally belonged to someone that bought theirs from an unnamed online superstore. It never came with shells, so he complained to customer service. They sent him a second one for free. The original owner gave me the first blaster as a bunch of bits because he disassembled it. Shortly after I won a bet with the same guy involving a gummy pizza, and used the money to buy replacement shells.

So I had a free, fully disassembled blaster, that I had no attachment to. I tried out the other Trilogy that was still in one piece and realized that I hated the stock setup. From then on I was set on hacking up my Trilogy one way or another.

I started with removing the stock. It was uncomfortable anyway. The diagram below shows the cuts I made in red. The line above 1 is for simply removing the stock. Leave the plastic wall that connects to the rest of the internals alone.

For the next part I decided to make a shell catcher. Since I only owned three shells, I built it around that. To save money and time I decided to reuse the stock and rebuild it as the catcher. In the diagram above, the second red line is where I made the cut for the height of the shell catcher. The total height for the catcher should be around 5 1/4 inches. This puts the top of the catcher just above the ejection port. Highlighted in purple is a piece of trim that can be removed. Areas in green needed trimmed with a dremel tool. Ignore the top line for the moment. The most important part of the bottom line is to shorten the screw pegs to clear the area for shells.

Now look at the second diagram above. Parts in purple should be removed. The part in yellow is important, save that for now. Now start clearing the area represented by the top green line in the first diagram, and the area in green in the second diagram.

The barrel could also be shortened for a total minimization. But that was a lot of extra work for little gain so I left it alone.

You want the yellow highlighted panel to face towards the bottom of what used to be the stock, tri-pattern out. If cleared properly this panel should slot into the green highlighted areas, with the angled end facing the original rear of the stock. When you are happy with the fitment, trim the top of the panel to match the top of the catcher.

If assemble correctly, the catcher should look similar to the image on the above. I recommend putting a panel in the slots on the front and rear of the catcher to add strength. Plastic from cheap picture frames or something similar will work. Similar material can be used to make a top door for the hopper, and clean up the rear of the blaster. I used a combination of wood putty and epoxy to fix the new catcher to the side of the blaster.

Finally, a coat of industrial yellow paint was added. It was available and compliments well with orange and black. The blaster was then reassembled, and detailing was added. A sling was added to compliment use as a secondary, and the Trilogy was done. 

Overall, this build cost $7 despite my best efforts. It was fun to work on this blaster since messing it up didn’t matter to me. At the end of the day I took a terrible primary blaster, and turned it into a mediocre secondary. I see that as an absolute win.

Remember to leave a like if you enjoyed this post and leave a comment below. Subscribe for more content like this and remember to share this post with people who might enjoy it.

January 9

Platform Overview – Out of Darts Jupiter

When it comes to the Nerf modding community, the people involved tend to draw out all the potential in a blaster. But what happens when people from the community decide to make their own performance-oriented blasters from scratch? Well, you wind up with crazy things like the Rainbow-pump, Caliburn, and the subject of this post.

The Jupiter is a machine pistol styled blaster (for lack of a better term) made by Luke from Out of Darts. Out of Darts is a company that specializes in aftermarket blaster parts, and the Jupiter is their in-house answer to sidearms.

Functionally you could think of the Jupiter as the Mac-11 of Nerf. It is a compact, full auto pistol, that is capable of emptying a magazine in under a second. The available fire rates from the store range from 3 rounds per second to 12 per second. That is not the max potential of the blaster though, I’ve heard of Jupiters firing as fast as 18 rounds per second. Though, almost regardless of fire rate, its infamously difficult to keep extra ammo in the magazine.

The Jupiter uses High Impact Rounds, and the largest standard magazine currently available only holds 12 rounds. There are rumors of a high-capacity drum magazine to be released in the near future. But there are other unusual options currently available if you are willing to strip the Jupiter of its sidearm status.

The Proton Pack effectively turns the Jupiter into an ammo hose. It is a large wearable pack that connects to the magazine well of the Jupiter. With this equipped you have access to 270 rounds without ever reloading. This is achieved with a hopper (its actually a cheese ball container) equipped with a blower that acts in place of a magazine spring. There was a prototype for a 1000+ round unit that seems to have never hit production, at least not yet. The “beta” model is currently out of stock.

This is where I have a problem with the Jupiter. The base model is $99, not including shipping, assembly, batteries, charger, magazines, or ammo. Granted, it has high quality parts. But the rate of fire is so high that this is almost unusable with normal magazines. Remember that Mac-11 comparison? That has a similar problem. Unlike the Mac-11, the Jupiter has a $99 pack that upgrades the capacity. That is just for the current 270 round beta version that is no longer available, not whatever might replace it. Compared to other blasters, you would have to be mad to buy the Jupiter as it stands!

For the same price from Nerf you can buy a Nemesis for $99, or cheaper of you bother looking around. But that includes assembly, ammo, and a battery tray (D cells with the option of rechargeable). With a quick rewire and Li-Po battery conversion the Nemesis can just about match the Jupiter’s performance and fire rate. The nemesis even has a stock advantage on capacity with a 100 round hopper. This can be upgraded cheaply and easily to hold tons of ammo. You don’t have to be an Adam Savage to pull off that kind of upgrade.

Overall the Jupiter is a bit misguided. Every time I try to write positive things about this blaster I just can’t get away from its flaws. It sits in a very small niche as a machine pistol, and an even smaller niche as a pack-fed heavy blaster. I love what the creator tried to do, but the Jupiter gets way out-performed by modified blasters for the price. There are other performance oriented blasters out there, but those are a blog for another time.

Remember to leave a like if you enjoyed this post and leave a comment below. Subscribe for more content like this and remember to share this post with people who might enjoy it.

January 9

State of The Blog – A Quick Change log

When it comes to writing this blog, there have been several ongoing issues that have not been addressed or fixed until today. There have been issues with grammar, commas, and general mistakes that needed fixed.  There is also the issue of length, which I want to address as well.  Finally, every blog thus far has not had a proper ending section either. So this post will address each of these issues and how they were handled.

Starting with the typographical errors in the posts, those should have all been fixed. Every post up to “Steam Workshop – Almost Too Convenient” has been checked over. Any errors I could find were fixed. Quality control on previous posts has been lax due to the ending time limit on this blog. With the due date of 1/8/2020, every post has been treated as if it is in a drafting stage. Small changes and fixes will continue to be applied over the next two days, but the most glaring errors should be fixed.

The blog posts have run long pretty consistently for a number of reasons. The first reason was a mix up of information. I started working under semi-loose instructions given prior to the course for a “…short(one page)” blog post. But during the first few posts I had somehow gotten the idea into my head that one page was around 500 words, so that was the minimum I was shooting for. Shortly after, I realized that I was running long. So over the next few posts I tried to shorten the posts, but by the time I got the detail I wanted they ended up long anyway.

I could shorten the posts, but not get in all the information I wanted. But then I would be making the exact type of content I hate – just enough information to get interested, but not enough detail to learn anything. This blog is already meant for a niche audience, the type of audience that welcomes lengthy detail. If a detail is not interesting at the time of reading, you are welcome to skip it, but if you need it later you’re welcome to come back.

Finally, the ending section. This has been implemented into all posts. Sellout sections simply slipped my mind. I usually leave a post or video well before these appear, so it was easy to forget about them. These will be included in all future blogs as well.

Remember to leave a like if you enjoyed this post and leave a comment below. Subscribe for more content like this and remember to share this post with people who might enjoy it.

January 7

Steam Workshop – Almost Too Conveinient

One complaint I always hear from people trying to get into modding games on PC is how difficult it can be. I wouldn’t personally say that modding is difficult, but I will admit that it can be pretty involved. Luckily, there is an easier way! Introducing the Steam Workshop.

The Steam Workshop allows PC players easy and safe access to mods. There are limitations to what workshop mods can be. Most mods reuse or replace assets that are already in the games you are modding. Entirely new content on the scale of externally sourced mods or ROM hacks is uncommon on the workshop, but the convenience of using workshop mods makes it worth it. Installing a mod from the Steam Workshop is super easy!

To install a mod from the workshop, first you must pick a game in your library that has workshop support. Then you must find that game’s workshop page. Finally just select a mod you want and press the green button.


It’s that easy.

Any mods you subscribe to will be automatically installed or updated next time you play the game they are for. Most workshop supported games have an in-game page that will let you manage the mods you have installed. To get familiar with this system again for this blog I dusted off my copy of Left 4 Dead 2 and fired it up.

Left 4 Dead 2 is a perfect example of how such a convenient system can go a bit wrong. With such easy installation, its easy for the number of mods to get out of hand. So a lot of the time workshop supported games devolve into a mess of over 100 mods, with almost no mods meant to go together. Just coming back to Left 4 Dead 2 today I was greeted with a few error messages for my trouble.

This is an inconvenience, sure. But don’t mistake having a chaotic mod library as an entirely bad thing. This can make your games a total mess, but it can also make your games a total mess!

Mod destruction is a weird and wonderful way to breath new life into a game and Left 4 Dead 2 does this very well. As standard the game is a fun zombie shooter but the appeal runs out after a bit. With a few dozen mods Left 4 Dead 2 becomes a surreal horror game about killing hoards of fish as Princess Peach. On top of that every special enemy in the game is something different. Half of the time I don’t know what is coming after me and its pure chaos. The other half of the time I’m fighting the Heavy Weapons Guy from Team Fortress 2.

Also, yes. He has his Sandvich.

The audio is also all over the place, the music is a mishmash of pop culture music. The main menu has the titular music of Rick Astley playing in the background. Left 4 Dead 2’s Tanks, the Heavy in my game, are accompanied with Country Roads by John Denver. The voices are also a total mess. For example the Witches (some of the strongest enemies in the game) are now voiced by Dora the Explorer. This somehow only serves to make that enemy more intimidating, even with a mismatched model from Pokémon.

There were also other characters in play that I couldn’t get decent shots of such as Baby Mario and Peter Griffin. Those were the few characters with correct sound effects. There was also a tub of Ben and Jerry’s ice cream (voiced by Crash Bandicoot, obviously) that I couldn’t get a good picture of either, The last enemy is some dragon that replaces the Spitter, I have no idea where it came from.

The other players seen throughout these pictures are players found in online matchmaking. I have no idea who they really are.

By now I think the point is clear. Mods can spiral out of control until games are barely recognizable. I’ve only talked about the changed enemies and this post is at 641 words. Weapons and friendly characters are also changed mostly beyond recognition.

With Steam Workshop you can install mods to your heart’s content and then some. The mods can spiral out of hand with how easy they are to install, but that is not always a bad thing. Destroying a game with mods is stupid fun and is always a different experience for everyone. You can keep mods tasteful, but that is a blog for another time.

Remember to leave a like if you enjoyed this post and leave a comment below. Subscribe for more content like this and remember to share this post with people who might enjoy it.

January 6

Timed Shutdowns Using The Command Prompt

At one point or another you will run into a scenario when you have to leave, but your computer is in the middle of a task. It always happens at the worst times, and sometimes that task cannot be interrupted. Luckily there are some solutions.

The command prompt is an excellent tool for getting the most out of your computer because you can access tools you didn’t know you had. This includes a timed shutdown function. Once you have the command prompt open this is what you need to know:

The first thing you need to enter is “shutdown”, then “-s”. This is to tell the the computer to log of and power down. The next part is “-t”, or the time you are setting. The time has to be entered in seconds. For example, 5 minutes would be 300 seconds. To have a timed shutdown of 10 minutes the command would look like this: “shutdown -s -t 600”

If you want to cancel the shutdown, simply type “shutdown -a”

For a bit of extra fun you can add a comment using the “-c” command. To do this you just have to add “-c” into the command with the comment you want to say in parenthesis after it. For example: “shutdown -s -c “get back to work” -t 600″ will have the computer shutdown in 10 minutes and display that message.

It’s really that simple. Timed shutdowns can be very useful in the right situation, but are admittedly very niche. There are other ways to manage your computer from afar, but this is a quick solution that requires no extra programs. Other programs can be used to manage your computer from somewhere else, but those are a blog for another time.

Remember to leave a like if you enjoyed this post and leave a comment below. Subscribe for more content like this and remember to share this post with people who might enjoy it.