January 10

Running a Buffer and Chain Engine With Knuckle Couplings

When it comes to model railroading, couplings do not always match up. Many live steam engines use some variation of the Buffer and Chain system, so making those work together is never a major hassle. In the United States, however, the most common system is the Knuckle coupling. So how do you make these work together?

Mixing different couplings can be done in a few ways, including using a sort of “translator” car. There isn’t a specific term for these cars that I know of, but they exist. This is essentially a car that has different types of couplers on either end.

To start, I grabbed a gondola that wouldn’t look too out of place next to the engine.

This gondola only has 2 axles, so it bears the closest resemblance to something this locomotive might have pulled. American rolling stock will always look out of place with this engine, but this model is at least acceptable.

I started with flipping the gondola over to check for clearance.

The space in front of the axle mount is the perfect place for a chain mount. For this I used an extra bracket that came with a cheap stereo.

This seemed to fit well into that spot, until I realized the knuckle coupling couldn’t clear the new part. I did not want to limit this gondola to only being used with one engine, so I had to find a way to make both couplers clear each other.

After checking the parts bin, I came across a small spring. If I had to guess, it probably came from a rail attachment point for a Nerf gun.

Older models of blasters had sprung clips to help hold accessories. Blasters with this part can be identified by pushing on the orange piece on the top of the blaster. You’ll know whether it’s sprung right away. These springs are short, fat, and pretty useless at holding on attachments. If you need a small spring for something, this is a place you can get one in a pinch.

So, I used the short spring to add a bit of height to the knuckle coupler. The spring helps hold parts under tension, which should keep the knuckle coupler from coming loose. After that, I made some chain from wire. This is the result.

Separate from the chain link permanently on the mount, there is also another a partially open link that can be taken off as needed. This allows for the use of the knuckle coupler as needed.

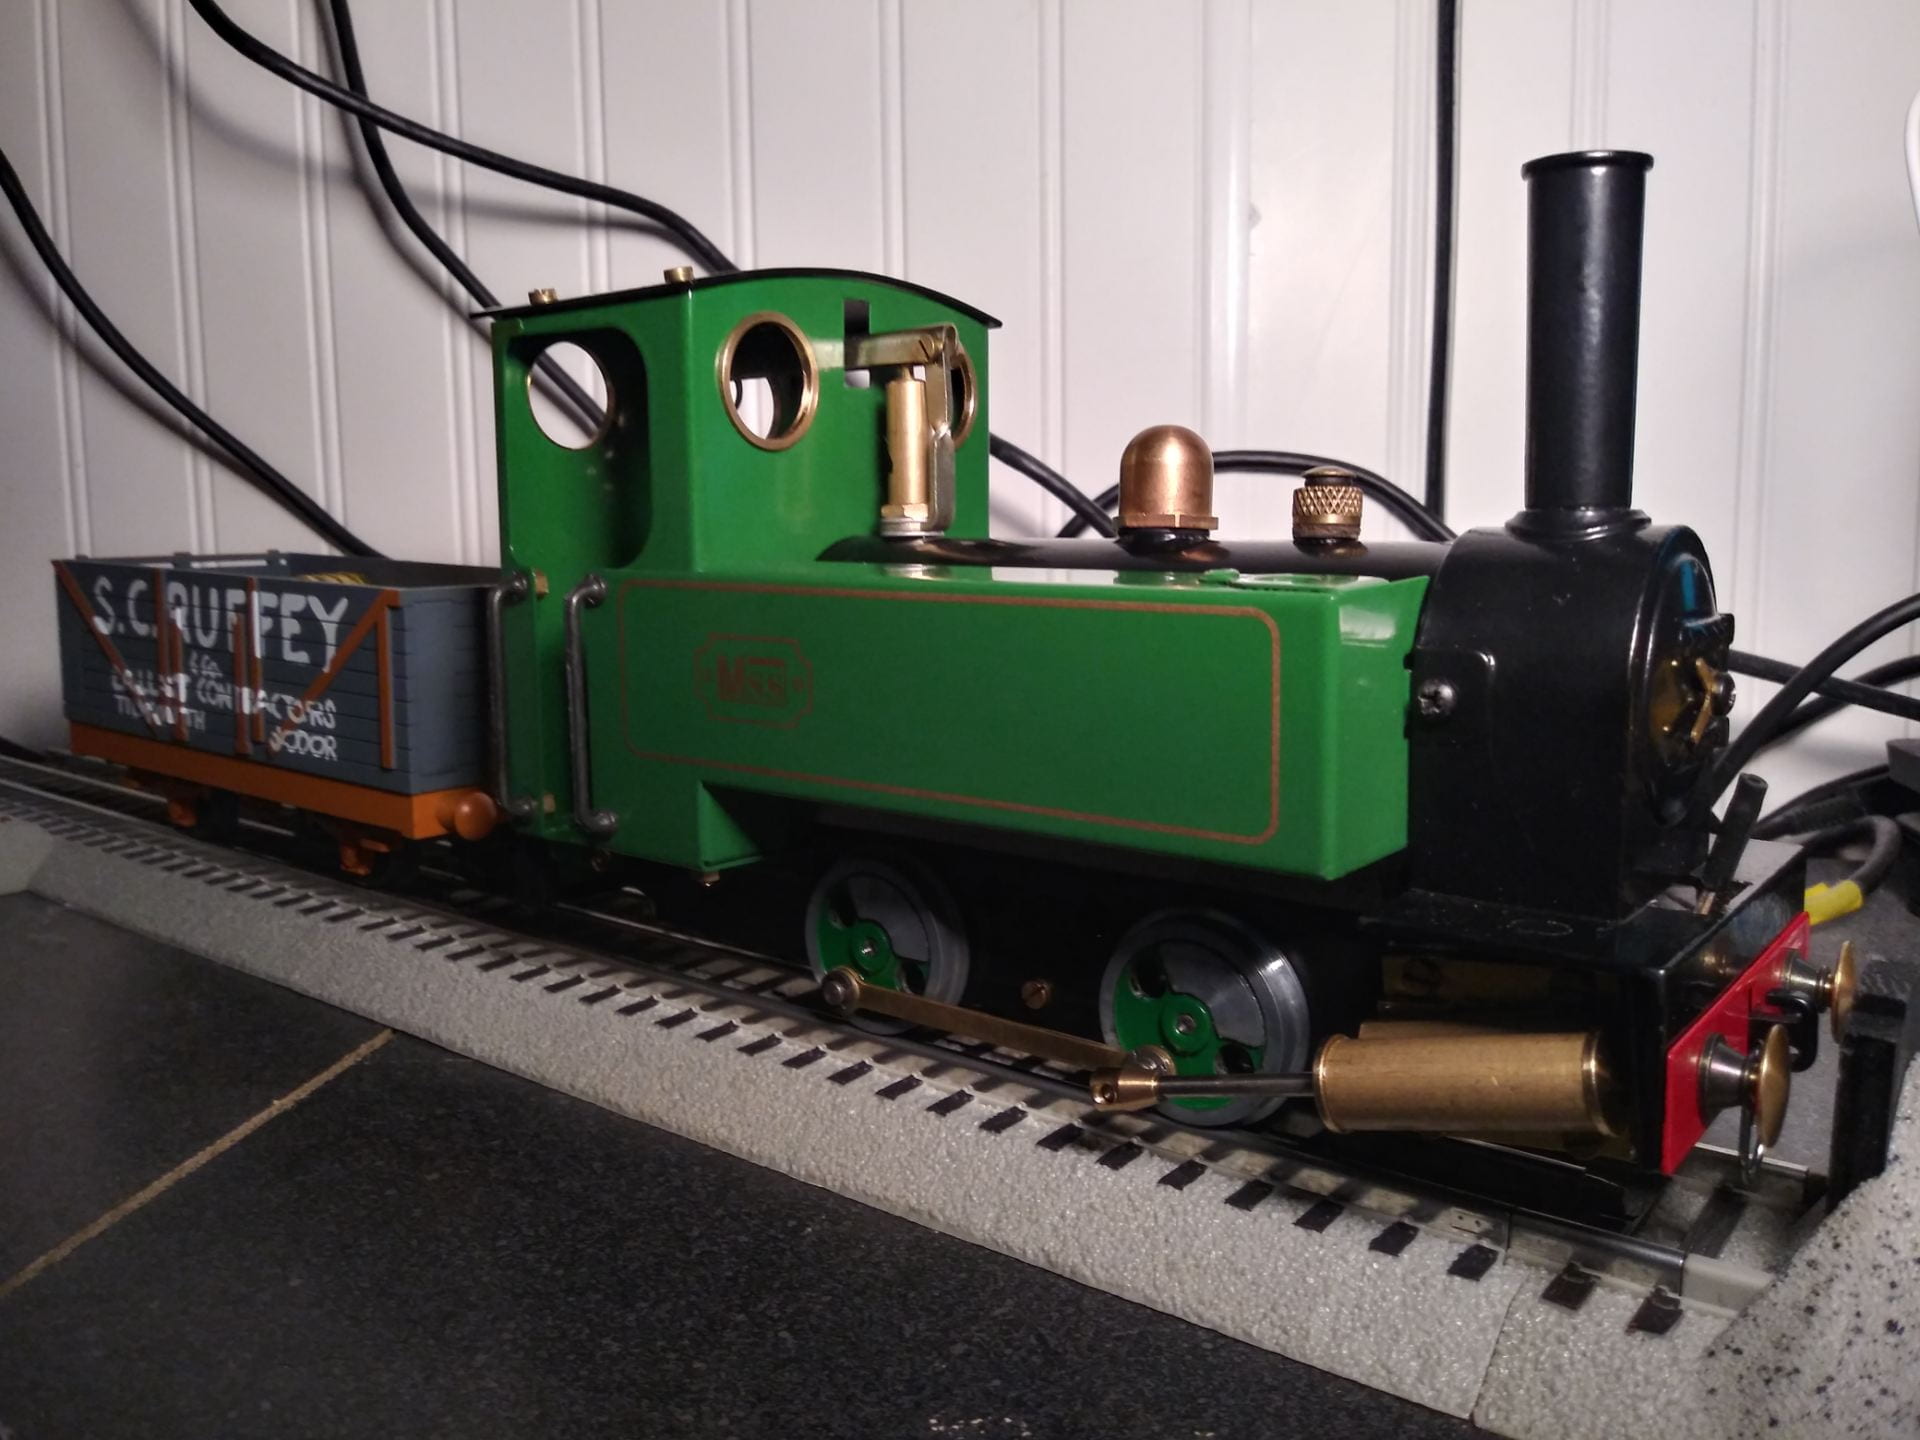
This system works pretty well on the tracks. The gondola now allows the MSS engine to couple to engines or rolling stock with a knuckle coupler.

But the gondola still works just fine when used with other rolling stock.


I am pretty happy with how the gondola has turned out so far. The only problem I have is the gondola is very light, so it tends to derail and jump switches. This can be fixed just by loading the gondola with something, which I am planning on anyway. I haven’t fitted the gondola with buffers at the moment. They are not entirely necessary for pulling and this is only a short term solution anyway. Eventually I will get/build rolling stock for the MSS, which will make the gondola obsolete.

Then again, having the option to pull and push American rolling stock with the steam engine could be very nice. So maybe someday I will get around to adding buffers to the gondola. But that is a blog for another time.

Remember to leave a like if you enjoyed this post and leave a comment below. Subscribe for more content like this and remember to share this post with people who might enjoy it.

January 10

A Look at “Mamodification”

When it comes to model railroading, I’ve always been a bit disappointed with the lack of customization with engines and rolling stock. This makes sense since most models are based on specific units with set liveries, but most models don’t even get basic weathering. A lot of model engines just stay standard and clean, which is a bit boring. This is a problem that is solved with live steam engines. Many live steam engines use freelance designs that aren’t modeled after anything in particular, which is great for customization. One model stands out above the rest for how malleable it’s design is; the Mamod SL1.

A stock MSS for reference.

The SL design has seen tons of variation over the last 40 years just in production models, not to mention what the modding community has been up to. Just through paintwork, trim, and accessories you can totally transform the look of the Mamod.

The bodywork can be pushed even further than that. Mamods have appeared as saddle tank engines and even trams.


MSR have even managed an American-styled Mamod.It only gets crazier from here on. This design even lends itself well to other wheel configurations. To start, take this 0-4-2 tender engine as an introduction.

There are also plenty of 0-6-0 Mamod designs out there as well. Take a look at this War Department styled 0-6-0 model.

From here we start to see the genuinely bonkers builds. It’s one thing to change up some bodywork or add a wheel, making the next model is a completely different level. This is a Mamod Garratt K1.

The level of commitment needed for someone to put together an articulating framed engine is bonkers. The Garratt Mamods are always beautiful and diverse. This is not even the only type of articulated Mamod that people have made. There are quite a few examples on the web of Double-Fairlie Mamods. Here is one such model.

The level of customization possible with a Mamod or MSS locomotive is unlike anything else I have seen. Live steam in general is more open to customizing locomotives, but the Mamod is particularly well suited to it. Down below are links to the forums related to “Mamodification.” You can also click each image above to go to their respective origins.

Click here for the Garratt.

Click here for the Double-Fairlie.

Click here for everything else.

Remember to leave a like if you enjoyed this post and leave a comment below. Subscribe for more content like this and remember to share this post with people who might enjoy it.
January 6

A Rundown of Mamod/MSS Locomotive Burners and Fuels

When it comes to Mamod-style live steam locomotives you are spoiled for choice with aftermarket parts. The sky is the limit for customization but you are often better off starting down low. The burner is one of the defining characteristics of your locomotive. Some fuels are harder than others to find. Some fuels are safer than others. But which one is best for you?

As standard, these locos come with a solid fuel tray that takes hexamine tablets. These are infamously terrible in pretty much every way. They have to be cut in half prior to use, they don’t burn consistently, and they smell bad. People have had problems with this fuel since this design was first released over 40 years ago. On top of the poor performance the solid fuel tablets are expensive. Plus they are harder to find in this country. Changing out from the stock burner is pretty much mandatory if you want to make the most of your locomotive.

The next option would be a methylated spirits burner. In the United States methylated spirits is actually very easy to come by, its just under a different name. Denatured alcohol is the same as methylated spirits except for the name. Denatured alcohol is very easy to get, reasonably cheap, and burns very consistently. Alcohol burners are built to run out of fuel just before the boiler runs out of water, which means that you do not have to worry about accidentally damaging your boiler. But denatured alcohol has its downsides.

Denatured alcohol is the least safe of the possible fuel options. The flames are difficult to see in sunlight, making it hard to tell whether the fire is lit. The burner has to remain upright or fuel will spill from the wicks and tank vent.  Denatured alcohol is also prone to flash fires, meaning you have to be exceptionally careful with it and watch for spills.

Image from dreamsteam.co.uk

The final main option is a ceramic burner. These run on either butane or a 70/30 butane-propane mix. This fuel is fairly easy to get and is about as common as denatured alcohol. The main downside is that this burner is more expensive than the previous option.  Ceramic burners are also much more fragile, so you need to be very careful with them. The final major issue with these burners is that they usually need to be paired with a silver-soldered boiler. It is very easy for these burners to melt the soft solder on a standard boiler. Ceramic burners have their downsides, but they have some good points too.

Ceramic burners generally have much cheaper fuel overall. They also have a much more controlled burn compared to other burners since you can directly control the gas. This allows for much better control over how fast steam builds and a higher potential steam pressure. With the correct upgrades a Mamod or MSS loco can run at 40 psi, as opposed to the standard 10 psi. Finally, ceramic gas burners are much safer than the previous options. If the locomotive is tipped over while running there is no possibility for a fuel spill.

I would be remiss if I did not mention a few of the other possibilities for burners. For starters you can use other fuel in the stock burner tray. Some people have supposedly had good results from using Sterno gel fuel as a substitute. It burns clean and is easier to find than hexamine, but leaves a film in the burner tray. Some people have also made solid fuel out of a combination of dryer lint, candle wax, and some other odds and ends. It works in a pinch but is not clean burning. Your loco will need cleaning after every use.

Finally, there is the possibility of a coal burning engine. This is not available as a kit and much be custom fabricated. This involves building an entirely different type of boiler and quite a lot of custom work. If you really want a coal fired Mamod or MSS, it is possible. If you want to know more about coal fired Mamods, you can read more here.

Overall there are plenty of options for firing a Mamod or MSS locomotive. Personally I use an alcohol burner since fuel and wicks are easily available, but there are options for everyone. A new burner is a great starting point for customizing your engine, but what comes next is a blog for another time.

Remember to leave a like if you enjoyed this post and leave a comment below. Subscribe for more content like this and remember to share this post with people who might enjoy it.

January 5

Compounded Steam Oils and Where to Find Them

I expected small scale live steam locomotives to have their trickier points. After all, you are essentially letting a kettle and stove run around in circles until one of them runs empty. But it turns out that is the easy part. The real hard part is getting oil for the thing.

To keep an engine in good working order you need proper lubrication, steam engines are no different. Unlike other engines, steam engines require something called “Compounded” oil. Compounded oil is oil that has been mixed with tallow (aka animal fat). The tallow allows for emulsification with water, but keeps the oil from being negatively effected. This makes compounded oil effective in environments with water or steam.

The problem with compounded oil is that it is hard to get in small quantities in the United State. Most manufacturers only offer it in large drums. The other option in this country is Wilesco oil. This is only available on two websites that I could find, one of which is E bay. The other option I have found is shopanatomical.com. This is primarily a medical science website, but they happen to have some odds and ends for steam engines.

This is where this blog has fallen by the wayside a bit. I was going to do a segment about how ordering internationally comes out a bit cheaper than ordering from a US option, until I realized my mistake. While redoing the math for this blog I realized that I misread the quantity of the Wilesco oil as 50ml rather than 5 oz. To keep this brief, Shop Anatomical does have the best deal for small orders of compounded oil. However, they only have one option.

Shop Anatomical only has one option for oil, and I am not entirely sure about it. The Wilesco oil seems to be a general use oil for small scale live steam engines. I cannot find specifics on the weight of the oil, but 460 weight seems to be a safe bet since that is relatively common. It should be fine for most small scale uses, but this is still worth noting.

In the United States there are only a few options for getting steam oil, but there are options elsewhere. dreamsteam.co.uk is a solid place for getting live steam locomotives and parts internationally. Even with not being as good of a deal because of shipping, they are still a viable option. They offer larger bottles of oil and have multiple weights available. You know exactly what weight and quantity of oil you are looking from the beginning on this website. There is no guessing like with the Wilesco offering. There are plenty of other international websites, but there are few that will ship to the United States.

Getting compounded steam oil can be a massive pain at first, but there are options out there. Luckily that is the hardest thing to find with small scale live steam. Other important consumables like fuel can by much easier to come by. But that is a blog for another time.

Remember to leave a like if you enjoyed this post and leave a comment below. Subscribe for more content like this and remember to share this post with people who might enjoy it.

December 31

Momentum Wagons – Taming Steam Engines

As mentioned in the MSS Side Tank Engine post, the old Mamod designs for locomotives have a reputation for running away. This is a problem with a lot of live steam engines but the Mamod design is particularly infamous for this quirk. There are a wide variety of fixes for this problem such as more consistent burners and better steam regulators. There are even “Slo-mo” devices that fit to a locomotive to keep speed in check. But that is an engine specific fix, what some people need is an interchangeable solution. Enter the KIKKERLAND Zecar!

Wait, that looks nothing like a something you would use for a train.

Well it normally wouldn’t be, but allow me to explain. This toy uses a friction engine to keep momentum when pushed. This is accomplished with a large flywheel in the middle that stores inertia, which is geared up relative to the wheels. This particular unit is just the right size to have its wheels changed out for Gauge 1 (45mm) track, and with further tweaks it can run on O Gauge (32mm) track.

But if you are trying to keep engines from running too fast, wouldn’t storing inertia be a bad thing? Well, no actually it is not. The friction engine from the Zecar overall limits top speed. But that stored inertia can help prevent engines from running away. A common issue with live steam locomotives is that they tend to slow down or stall in corners, build up steam pressure, then rocket off at speed. The momentum from a unit like this keeps the engine moving and prevents a pressure buildup.

With the right adjustments the Zecar can be converted into a cheap and effective momentum van to regulate locomotive speed. This idea specific idea has been floating around since 2015 and has seen numerous variations. The first one was built by Zach Bond and I would highly recommend reading this article about it.

At £20.00 on Amazon, the Zecar would be reasonably cheap in the UK. Unfortunately I am not in the UK! But with the knowledge of how these momentum vans work, I can start keeping an eye out for a US equivalent. But that is a blog for another day.

Remember to leave a like if you enjoyed this post and leave a comment below. Subscribe for more content like this and remember to share this post with people who might enjoy it.

December 30

Platform Overview – MSS Side Tank Loco Kit

If someone had told me as a kid that I could build my very own steam engine, I probably would have believed them. Granted, I was pretty gullible, but I wouldn’t have been any less excited. Here I am now with a stupid grin on my face. This is the MSS Side Tank Loco, and it’s a dream come true.

So what exactly is this engine? Long story short it’s a steam engine, but tiny. For reference the boiler is about the diameter of a pocket-sized can of WD40 or one of the extra small cans of soda, but twice as long. Buffer to Buffer this loco is 8 1/2 inches long, and just short of 3 inches wide. Compared live steam engines normally found in the US this thing is tiny!

If the styling of the loco wasn’t a dead giveaway, then that last sentence would have been. This engine is an imported model from the United Kingdom. For whatever reason small scale live steam engines never caught on in the US. The smallest you will usually find is 3 1/2 inch gauge models. (gauge is just the width of the track.) O Gauge engines are very popular in the US but live steam in that size just never caught on. So this model is an oddity here.

Styling wise the MSS is a bit strange, as it is not based on aF particular engine. The closest prototypes would be Welsh narrow gauge locomotives, but no particular engine is a perfect match. The design of the MSS Side Tank actually goes all the way back to 1979 with the Mamod Sl1. There are few differences with these models other than namesake, the option of a diamond shaped chimney on the SL1, and the exhaust pipe. These models are so similar that parts are completely interchangeable.

As far as individual parts go, there are some standouts. The MSS features double-acting pistons. This means that the pistons provide power on every stroke in either direction. This was uncommon when the design first cropped up, and is still a nice touch today. Another curious thing with the pistons is that they are oscillating. This is incredibly rare on steam locomotives, model or not. This eliminates the need for valve gear but tends to hurt efficiency. The oscillating pistons make for a cool curiosity but takes away from the model’s  (relative) accuracy. Finally, as one last feather in this model’s cap, the steam dome is functional.

Of course with this model you get intimately familiar with every piece of the engine. This unit is kit built, meaning you get a box of bits and some instructions. Beyond that the rest is up to you. There are pre-built units available, but that’s no fun. This loco is in that sweet spot of simple to understand but hard enough to be fun to assemble. After assembling this kit, there is the matter of running in.

Running the Side Tank Engine is an exercise in patience. First you need to check that everything is working correctly. Does the safety valve work? Will the whistle stick? Is the burner on the whole way? There are all kinds of little things that need checked. Then comes oiling all the moving parts. Next the boiler needs to be filled just right. Then the denatured alcohol burner needs to be filled perfectly, and carefully. (note: the MSS engines come with solid fuel burners, but a burner change is almost mandatory if you want to be able to get fuel in this country) Any spilled fuel could turn into a flash fire in a heartbeat. After all of that the fire can be lit and the 5 minute wait for the water to boil can begin. Once the engine has reached at least 7 psi (it maxes at 10 psi) then you can start running it… for about 15 minutes. That time is assuming you don’t stop partway through the run to re-oil like the manual suggests. With a dead-leg oiler upgrade you could run for the entire 15 minutes with no interruptions.

While running these locos you are always in for a show, for better or worse. When run for the first few times steam engines need time to settle in. Water and steam will leak a bit for the first few runs before the engine is finally run-in. After being run-in the MSS will purr like a kitten while running, albeit an energetic one.  Ever since the early 80’s this design has had a reputation for running away when on the tracks, and the MSS Side Tank Engines are no different. These engines just don’t do “slow.” The weird regulator/reverser block that controls these engines just is not built for it.

A slow engine is a very big deal to people that are into model railroading. A model like a Mamod or MSS poses a challenge for modelers. How do you tame an engine that just wants to run away? That is a blog for another time.

Remember to leave a like if you enjoyed this post and leave a comment below. Subscribe for more content like this and remember to share this post with people who might enjoy it.